
Having discussed my experience with different well screen designs in former columns, if you get the idea I’m a proponent of stainless steel or bronze wire wound screens, you are right. Actually, I’m not sure bronze or brass screens are available anymore. I have not seen a new one in a lot of years. In my opinion, that is OK. Stainless steel works very well, at least in the waters we encounter here in the Midwest.
Now, I realize that some readers may find different aquifers and different water qualities in other parts of the good old USA. I am aware that louvered screens and even punched pipe screens are used in some regions—most often, I understand, in areas where gravel-packed wells are popular. I can, however, only relate my experiences in Michigan, where we have a lot of wells in the ground, and I will remain a wire wound SS screen man ‘til I’m long gone.
I have known some drillers who used kind of a hybrid screen in my opinion, that being a pipe-based screen with wires wound around the outside of it. One fellow really liked these, as he could drive them in and they were heavy duty, to say the least. What results he had I’m not sure of, and he has been retired for many years and in fact died quite a few years ago. This design, while rugged and heavy duty, looked to me like a somewhat improved version of the gauze screens that caused me a lot of trouble. This fellow really liked them, though, and I think they worked for him. As I have said in the past, if it works for you, go do it.
|
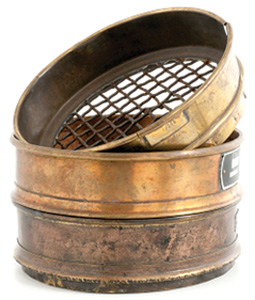
| Sifting samples through a series of sieves can help drillers find the right slot size for screens in any formation. Source: iStock |
In any event, no matter what kind of screen we are using, its design or the material it is made of, the openings have got to be proper for the aquifer the screen is going to be installed in. For this discussion, I’m going to limit myself to selecting slot sizes for wire-wound screens. Now, many experienced drillers I have known would merely look at a handful-sized sample of a sand and gravel aquifer and say, “This needs a ???? slot screen.” Some fellows had a favorite size they used on almost every well, regardless of what the sample looked like. I must admit, I have done this myself a very few times in my career and when I also analyzed the sample found I was going way too fine in my slot selection.
A step up from this eyeball method is to use what I call a “comparator,” for lack of a better term. This is a little clear-walled plastic tube with divisions in it and four, five or six fine or coarse materials within each division. Each division also had a suggested slot size and the driller could compare what was in the tube with his handful of sample and make a choice. I don’t know if these little tools are still made. I know I have several that are pretty old, but you can carry them in your shirt pocket and they are quite handy.
The best way to choose a slot size is to run a sieve analysis. To do this you are going to need a set of standard sieves ranging from coarser to finer, a method to dry the sand, a couple pans and an accurate scale, plus some graph paper—especially a type designed to be used in this process. Take a representative sample right from your bailer or through the wash pipe on a rotary. Collect about a half gallon of sample for each part of the aquifer, if it is very thick, and only one sample if you are going to install a 3-, 4-, or 5-foot screen. It is best to take this sample back to your shop and dry it out by placing it in a metal pan and heating it on a hot plate. You can even do this on the kitchen stove of your home or in the oven, and about the second time you do this your wife will tell you to get out and stay out until you have better tools. At least, that is what happened to me.
Sieves are made to a national standard and available in several diameters. They are like a little round tray with a screen for the bottom. These are not cheap, but a small set (I have some that are 4 inches in diameter) is adequate for the average contractor. You can get these in larger sizes and even with an electric shaker if you are doing a lot of this type of work. Stack the sieves with the pan at the bottom and progressively coarser sieves—you will need at least five or six to the top—then place a cover on the top one. Place the dry sample in the top sieve and shake the whole thing vigorously.
After you have shaken the sieves, take them apart and weigh what each sieve has retained, adding each sieve as you go starting with the coarsest first. For this, you need an accurate scale and you need to record the results accurately. When the entire sample has been weighed, calculate the percentage of material retained by each sieve—all this by weight. In other words, you would record the total held by the coarsest sieve then the total by the second-most coarse, the third-most coarse and so forth, until you add the contents of the bottom pan for the total. This sounds a little complicated, but it is not really. Using the graph paper you can create a line which is a little like a reverse S curve that at the top does a sweeping left S as it approaches 100 percent and the bottom a sweeping right S as it approaches 0 percent.
The hard part of this really effective method is to now determine at what point you want to pick your slot sizes based on the percent retained by weight. I will talk about this next time.
As I write this in early September, we have experienced some hot, humid weather here in Michigan. The last few days, though, have been pleasant with cool temperatures and low humidity. We have had enough rain and those fellows with those new center pivots have still not used them, at least not very much. If my instructions on doing a sieve analysis have you confused, contact me through National Driller and I will get back to you and do a better explanation.


Report Abusive Comment