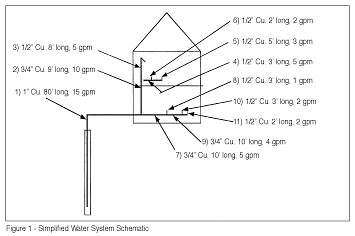
1) Make a sketch of the piping system like Figure 1.
2) Determine the peak flow rate.
3) Determine the flow rate through each section of pipe, working from the farthest fixture back to the pump, and note it on your sketch. Also note the diameter, type and length of the pipe in each section.
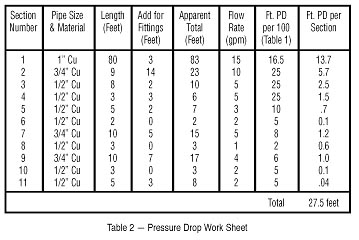
4) Add the equivalent lengths for the valves and fittings to get the total apparent length of each section.
5) From a pressure drop table like Table 1, find the pressure loss per 100 feet, and calculate the loss for each section of your system.
6) Finally, add up the pressure losses of all of the sections, and you have the total dynamic pressure loss.
Let's try an example using the system in Figure 1. We will plumb it all in copper and ignore the valves, tank fittings and fixtures for simplicity's sake. In an actual pressure loss calculation, the loss through these items should be considered.

To review, there are three elements that must be considered in determining the pressure requirements of pumps:
- The lift pressure, which is the pressure required to get the water from down in the well to the pressure tank. In our November example, we had a total lift pressure requirement of 60 feet.
- The household pressure, which is the pressure required to feed the highest point in the system with at least 15 psi. This household pressure is controlled by the pressure switch. If you need 15 psi at the highest fixture in the house and another 15 psi to get it from the pressure tank up to that fixture, you'll need a 30/50-pressure switch. Remember to add the pressure switch differential to determine the pumping pressure required. For a 30/50-pressure switch, you'll need to allow for 50 psi of pump capability to have a minimum of 15 psi at the highest point.
- The friction loss in the piping system, as we did this month when we came up with 27.5 feet.
Next month we will talk about the pump selection process, how to read pump curves and how to select the right pump. If you want to get a head start on pump selection, use the pressure requirements we came up in these last three articles on pumped water systems, and see if you can find a pump that would give you 15 gpm in your favorite pump supplier's catalog.

Report Abusive Comment