Splicing submersible pump cable is part and parcel of every submersible pump installation, because every submersible pump installation has at least one splice -- between the motor leads and the pump cable. Although it sometimes is necessary to splice two lengths of pump cable together in very deep set applications, it is always better to use a single length of pump cable from the surface to the motor lead whenever possible. Most pump distributors have access to cut lengths of pump cable in lengths longer than 1,000 feet.
Making a proper splice is crucial to a long-lasting, trouble-free installation. A good splice is watertight, has good electrical conductivity and is mechanically strong. There basically are two ways to make a splice: the tape method and the shrink tube splice kit method.
Tape Method
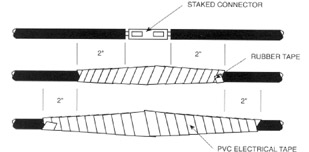
The tape method was the only way to make a good splice until shrink tube splice kits became available. Many installers still use tape because it has worked for them for years. As shown in Figure 1, you crimp the conductors together, wrap each conductor with a layer of rubber tape followed with a layer of plastic electrical tape. This makes a watertight connection and insulates the conductors from each other and the well casing. Properly done, this technique makes an excellent splice, but is very time consuming.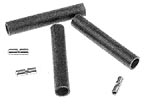
Splice Kits
Splice kits consist of metal crimp connectors called stake-ons, which make the electrical connection, and shrink tubes, which make the splice watertight (see Figure 2 on opposite page). Shrink tube is a fallout of the aerospace program. It is a polyolefin-based plastic tubing that has an adhesive coating on the inside, and a unique property that allows it to shrink in diameter to about a third of its expanded size when heated with a hot air gun or torch. The adhesive bonds to the wire insulation, making a very strong watertight joint.Splice kits come in a number of configurations. They are sized for the particular pump cable size you are using. Kits for the smaller sizes of cable are designed to handle several sizes of pump cable. For instance, one kit will work for #10, #12 and #14 cables.
Transition Splices -- Sometimes it is necessary to splice a large size wire to a small wire, such as when you have a small pump in a fairly deep setting requiring large diameter cable to handle the length. The motor leads will be smaller than the pump cable, requiring a transition splice. If the transition is small, like between a #10 motor lead and a #8 pump cable, just crimp the #8 stake-on onto both of the wires. If the transition is between a #10 and a #6 or larger, it usually is possible to crimp a #10/14 stake-on to the small wire, and then crimp the larger stake-on over the small stake-on. This makes for a better splice, both electrically and mechanically.
The same technique is used when installing the shrink tube in a transition splice. Cut a short length of #10/14 shrink tube, and shrink it onto the motor lead to increase its diameter so that the #6 shrink tube will make a good seal over the entire splice.
Shrink tube material is available in four basic types, standard or heavy wall, and black or clear. Most installers prefer heavy wall. The choice between clear and black is up to you. Black has been the most popular for years, but clear is gaining in popularity because it allows the installer to see what is going on in the joint as it is being made.
Making a splice with a splice kit is a five-step process.
1) If you are splicing jacketed pump cable, strip the jacket back far enough to give you plenty of wire to work with. Cut the individual conductors to a length that allows you to stagger the splices in order to minimize the overall diameter of the splice. This reduces the possibility that the splice will rub against the well casing and possibly short out.
2) Strip the insulation on each conductor far enough to allow the copper wire to protrude halfway into the stake-on.
3) Slide the shrink tubes over the insulation on all of the wires.
4) Crimp the stake-ons onto the conductors.
5) Center the shrink tubes over the crimp connectors and heat the tubes starting in the center until it is tight around the insulation and adhesive has extruded out both ends. If using a torch, be careful not to burn the shrink tubes and wire insulation.
6) (Optional) Seal the entire splice area with plastic electrical tape or a piece of large diameter shrink tube, overlapping the splice by 3 inches to 4 inches.
Make sure to provide good mechanical support for your splices by taping the pump cable to the drop pipe above the splice, and taping the motor lead to the drop pipe below the splice. Even though the splice has good mechanical strength, proper support will assure a long-lasting, trouble-free connection.
Next month, we will switch gears and talk about how to calculate pressure tank performance using Boyle's Law.

Report Abusive Comment