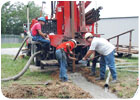
Taking samples during drilling.
When drilling an irrigation well or some other high-capacity well, proper sampling can make a huge difference in efficiency and total production. There is a big difference between a house well that, in a lot of areas, will produce enough water even if you mis-size the screen or gravel pack, and a high-capacity well that needs to produce all the water that the aquifer will furnish. Accurate sampling is the key.
When designing a well, often an accurate depth to the aquifer is not exactly known. In some aquifers, the grain size, porosity, permeability and the amount of cementation varies considerably from the top to the bottom of the producing zone. A properly drilled test hole and accurate samples can help determine the casing point, screen slot size and length, gravel pack size and volume, and in some cases, development methods to make the most efficient well.
One of the most important considerations in test-hole drilling is the size of the test hole vs. the size of the finished well. Most large-diameter wells require several passes to ream the hole to the required diameter.
Available bits, stabilization, drill string diameter and mud pump capacity all play a role in determining test hole size. In general, the smaller the diameter hole you can drill for the test hole, the more harmonious the outcome will be. Slim-hole drilling with a properly stabilized bottom hole assembly – including drill collars and stabilizers – will drill a straighter hole. Each succeeding pass to open up the hole to the final diameter will follow the pilot hole, resulting in a straighter well.
Another advantage to slim-hole drilling during the test-hole stage of a well is bottoms-up time. This is the time it takes for the sample to reach the surface and be captured for analysis. The smaller the annular volume between the drill pipe and the hole, the faster you can circulate out the sample and continue drilling. On shallow wells, it is common to stop penetration and circulate the hole clean for every sample. On deeper wells, this process may take so much time to get bottoms up that a faster method is used.
Calculate the pump strokes necessary to get bottoms up and start counting whenever you drill a zone of interest. After the appropriate number of strokes, the sample will be at the surface. Drilling can continue during this time because the deeper samples will take more pump strokes to come to the surface. Drilling and sampling can be continuous if you know where the samples came from vs. where the bit is now.
Sample accuracy is another advantage of slim-hole drilling. With a smaller annular volume, cuttings are less likely to be degraded and mixed with cuttings from another zone. A good solids-control system helps a lot in test-hole drilling. It will prevent recirculation of drilled cuttings and prevent confusion as to where the sample actually came from. You do have a good mud system, don’t you?
Faster penetration is another advantage to slim-hole drilling for the pilot/test hole. Of course, you say, “What’s the difference? I’ve got to ream out to the final diameter anyway.” The difference is the more quickly you finish the test hole and get the samples to the lab to be sieved, the quicker you will know the final screen slot size and length, and the appropriate gravel pack size for the formation you intend to produce. Plus, if you drill too deep and have to plug back, it takes less material and time to plug.
Your mud pump can lift the cuttings only so fast, and no matter what size hole you drill, you are limited as to the penetration rate by how fast you can produce a clean hole.
Sieve analysis reminds me of a story – you knew I’d get around to it sooner or later, didn’t you? Some years ago, we had bought a new house, and Lottie was proud of it. We had held off until the kids were grown; house maintenance is easier without a three-teenager-demolition-crew around. One day, I brought some samples home to sieve to make a screen/gravel pack suggestion for a customer. Since it was winter, I decided to do it in my office. My sieve set is 12-volt-powered for field use, so I got a battery out of the welding machine to run it.
I put the battery under my drafting table and proceeded to dry the samples on Lottie’s stove with Lottie’s frying pans – hey, she was at work, she’d never know! By the time I got the samples dry and ready to sieve, I realized that the battery was dead. I went out to the shop and got a charger and hooked it up. I ran the samples and got most everything put away before She-Who-Must-Not-Be-Disobeyed got home – no problem. A few days later, I went into my office to find that the charger I had forgotten to disconnect from the battery I’d also forgotten, had charged the battery to the point of destruction.
Darned cheap batteries! There was a battery-sized hole in the floor, pieces of battery stuck in the walls, and battery acid all over. I looked in the hole and saw the base of the battery sitting on the ground in the crawl space below. Uh-oh! Lottie was due home pretty soon, and I wanted to avoid “The Look,” plus all the words that go with it. Since it was a new house, there were some carpet remnants rolled up in the closet, so I got one and covered the hole with intention to fix it the next day. I naturally immediately forgot about the whole project until one day a few days later when Lottie happened to go in my office and stepped in the hole! By the time I got home, she was mad as a baptized cat!
She called some fix-it guy, had half the floor replaced, plus the carpet, and told him to give the bill to the big dummy – me.
Won’t soon do that again ….
ND


Report Abusive Comment