
In my last several columns, I discussed selecting a screen for our water well and some installation methods. Having our screen installed, we move onto the next step in constructing a good water well: developing the well and the formation around the well screen. I believe that every water well should be developed at least to some degree. Now, for a domestic or small commercial well, we may develop for only a short time and use only one method. For a high capacity well for whatever use—industrial, municipal or irrigation—we need to develop that well to its maximum capacity, least draw-down and highest efficiency. On these wells, we may use several development methods.
Perhaps the simplest way to develop a well is to simply bail it using a dart valve bailer. Here, the longest bailer that our rig can easily handle is the ideal way to go. Most drillers, and I include myself in this category, use the bailer that was used during the drilling process. Now bailing, while it is not a development tool, has sev eral advantages. It will give us a very rough estimate of the capacity of our well and is indeed the only method some drillers use. Bailing will even give us a bit of a surge effect in that when the bailer hits the top of the water in the well, it will displace a bit of water and give us a little back flow into the screen—not much but a little bit. Also, the stop and go of the water into the screen when using the bailer will help to agitate the formation. Unless the well has a very high static level, I am not one to recommend only bailing as a development method. Some pretty good drillers that I know use bailing and only bailing as a test pumping development tool, and this has worked for them for many years. Of course, if we are drilling a rock well, bailing is one of the better ways to pump it. But we are really talking about screened wells.
Another method preferred by some drillers is to over pump the well. That is, if we want 20 gpm for our production rate, to pump the well at 40 gpm. This is not a very good method, as the sand grains in our formation tend to bridge and the only way to really loosen them up and bring them out of the formation and into our well screen is to reverse the flow from into the screen to out of the screen. I would have to say that over pumping is a “quick and dirty” method of development. At this point, it might be good to remember why we were so careful in selecting the openings of our well screen. If our screen has openings way too fine, we’re just not going to get proper development. That being said, it is good to note that the larger the well and the higher capacity, the more development is going to be needed.
|
|
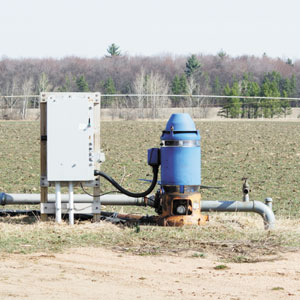
It’s critical to develop higher-capacity wells, like this one for irrigation, to optimize the available gallons per minute production. Source: iStock |
Remember, too, that development is not easy. I’ve heard drillers say that they developed the formation several feet from the well screen. Sorry, but I really have a hard time believing this and most good drillers, hydrogeologists and engineers agree with me that development—even a few inches from the well screen—is very difficult.
A method popular with cable tool drillers, and hollow rod drillers for that matter, is to test pump our well with a plunger. In this case, if we are drilling a 2-inch well we will most likely seal the top of the well screen with a bremer check valve. If we are drilling a 3- or 4-inch well, we will probably have to temporarily install a bremer check at the top of our screen, which will likely be equipped with a K packer. In any of these wells, whether 2-, 3- or 4-inch, we then lower a plunger into the water on drop pipe in a 2- or 3-inch well, and either drop pipe or our drilling tools on a 4-inch well. We start the spudding motion and rather quickly will have water coming out of the casing. A Tee in the casing at the top of the ground and a short section of riser pipe above the Tee will allow the water to flow out into a ditch and hopefully away from our rig.
You are probably saying, “How’s pumping like this considered development?” You have to remember that a plunger pump only pumps water on the up stroke; on the down stroke, our check valves hold the water in the casing. There is very little back flow as the popit in the lower check valve seats, the flow of the water into the screen is, however, headed in, then stopped and then headed in again. I believe this stop and go pattern of the water does give some development and improves our well. In my career, I’ve pumped hundreds of wells this way and after pumping long enough for them to produce clear water I had very, very few sand pumpers, whether it be from another test method or the permanent pump. This method also makes it quite easy to get a capacity figure for our well, but not nearly as easy to get a drawdown figure. On a 4-inch well and a 26-inch stroke on our spudder, it’s no trick to produce 60 gpm with this method if the formation will produce that amount of water. Some drillers have connected their plungers and check valves into a handy dandy pumping tool that is much easier to use than the separate parts.
I will continue with methods of development and tales of my own experiences in my next column. As I write this in the last few days of 2013 the weather here in southern Michigan has been kind of goofy. We have had one significant snow storm with about 6 inches dumped on us and some pretty cold weather, with morning temperatures right around 0 degrees Fahrenheit. That snow is all melted off and it was about 40 degrees today, and everything is muddy and spring like. Hope this finds you busy and working safely in early 2014.
For more John Schmitt columns, visit www.thedriller.com/schmitt.


Report Abusive Comment