
Last article, we talked about what to look for during a wire rope inspection. This month, we will talk about where and how to look for damage on a wire rope.
Much of a wire rope can be in good working order, while some sections may still be at the point of replacement or failure. This premature wear occurs at points where the rope bends over a sheave or, during drill operations, winds onto a drum during initial loading. On a drill rig, most of the time we apply a load to a winch, we either pick up a rod or piece of casing at the table, or at a rod box or rack. This means the same length of rope moves over the sheaves and enters the drum each time the operator applies a load. Wire rope wears much more quickly if subjected to bending because the outer wires and inner wires travel at differing speeds when going around a bend. Loading a rope while it bends increases these stresses.
Most inspections will be done by some type of visual method, many times a combination of different visual methods. This column covers a few different methods.
The first method involves a rag or glove. With a rag or glove fully covering your hand, lightly grasp the rope as it moves at slow speed. External broken wires often stick up and, as the rope moves, snag the rag. The rope is then stopped, and the inspector assesses the condition by a visual examination. If he finds a problem, he marks the rope at the location of the broken wire. The inspector then checks the rope for broken-wire removal criteria and, if none are found, continues the inspection.
As a safety professional and a driller who has had steel splinters from a wire rope, I do not like this method. Inspections done this way run a high risk of hand injury for the inspector. Worst of all he may not even find all the deficiencies, because not all broken wires stick up and catch the rag.
Instead, I recommend a thorough, visual-only inspection. The method I prefer is to move the rope 2 or 3 feet at a time, and stop and visually inspect the rope looking at all sides. In cases where grease or grime cover the rope, clean with a wire brush or many defects may elude detection.
While inspecting, bend the rope to look for “valley breaks.” These breaks happen down where the strands contact each other and can be difficult to see unless the rope is bent. Valley breaks occur in wire rope applications involving small-diameter sheaves, sheave grooves that are too small and heavy loads. During inspection, pay close attention to areas of the rope that come in contact with sheaves and drums when picking up loads.
Make a habit of lubricating wire rope as part of any regular inspection. Wire rope is lubricated during manufacturing, but initial lubrication is not enough to last the life of the rope.
Lubrication of wire rope is as important as lubricating any other component or piece of machinery. Clean and dry wire rope before applying lubricant. Remember, actual lubrication occurs only when lubricant can encounter bare wires. For wire ropes used under working conditions, choose a lubricant that specifically says cable oil. Do not use WD-40, PB blaster or crankcase oil to lubricate wire rope.
Apply lubricant to wire rope by:
- Continuous bath
- Swabbing
- Paint brushing
- Spray nozzle
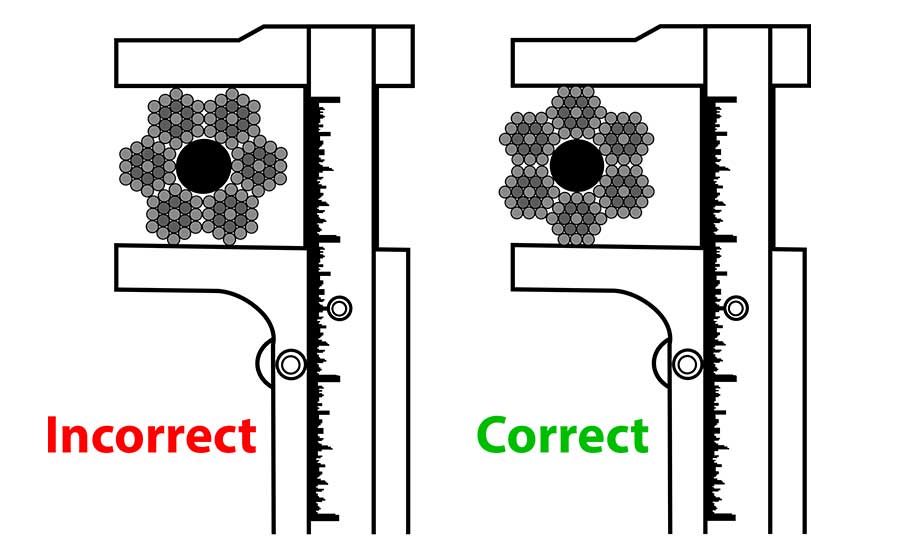
The next thing we must look for during inspection is a reduction in diameter. This is the only approved way to determine the stability of the core of the rope. For this type of inspection, we need two numbers that we should have gotten upon installation of the wire rope: the diameter and the overall length.
Place a caliper on the widest point of the rope to get the correct diameter reading. Generally, ropes are manufactured larger than nominal diameter. When placed in service for the first time, diameter can reduce slightly. Therefore, make the initial measurement of a rope diameter after the rope’s initial loading or break-in period. Record this measurement as initial diameter on the inspection log. Remove a rope from service when its actual diameter falls to 95 percent of its nominal diameter.
The overall length of the rope to the inch acts as a good tool in determining core health. When a core fails, the length of a rope increases. Any increase in rope length is grounds for replacement.
All of this is a little labor intensive, and should be documented during a monthly inspection. As noted in an earlier column, a daily visual inspection must be done (but may not have to be recorded, except to say the rig is safe to run).
Stay safe until next month, when we will wrap up our wire rope series with a little talk on end connections.


Report Abusive Comment